Toadstool Curio Blog
The home of an ecclectic range of paper, digital, fabric and yarn crafts, plus a few mixed media projects to spice things up a bit!

Monday 26 September 2011

Aprons, Pinnies and Cover-Ups


I'm not sure why, but another of my favourite things is an apron. I have quite a few, mostly handmade. I have the traditional pinafore type, wrap-overs, tabards and 1940's inspired cover-ups. There is something quite personal about giving an apron (either handmade or shop bought) as a gift. It shows that you care about the person, that you know the sorts of things they like to do and that they like to stay clean while doing it!


Here are just a couple of aprons I have made recently. The red one was for a friend of mine who also loves to craft. I made a wrap over style with pockets for storing odds and ends whilst she is working. It is embellished with ribbons, yo-yos and buttons because she loves them as much as I do.


I made the ice-cream patterned pinnie for my daughter's 6 year old friend. It is made from beautiful quilting cottons, retro ice-cream print for a bit of humour, plus lots of pieces of Moda's Wonderland jellyroll just because it is so pretty and picks up on the ice-cream colours. I had fun with this one, using ruching, patchwork, fabric flowers, buttons and ribbon trim. I used satin ribbon for the ties to make it easy for little fingers to undo.

I have also made aprons for my son and his friends, so that they can wear it whilst playing the Nintendo DS consoles. They have a pocket to keep game cards in and a larger pocket to store the console in when taking a break. I made these from black and white checked print combined with New York Yellow Cab prints and another version featuring aliens and starscapes. I also made aprons for gardeners which I sold at a Christmas craft fayre. Maybe I am not alone in my liking for this most practical of garments?
One of My Favourite Things


I love bags, but in recent years, I have moved away from leather and leather-styles to softer fabric bags. Maybe it is because they tend to be larger and I am generally carrying a ton of baby stuff with me whenever I leave the house, but I think it is most probably because I just love fabrics.


I love making bags and have tried all sorts of patterns and designs of my own, but for a quick and easy handmade gift, I keep coming back to the simple, chuck it all in, bucket-style bag.


As I have been thinking about making myself a new bag, I thought I would share a few snaps of some of the large bucket bags I have made recently. I have used some gorgeous cotton prints (Michael Miller, Cath Kidston, Amy Butler, Moda included), usually using a contrasting lining, also of 100% cotton. If I am using the lighter weight cottons, such as gorgeous quilting fabrics or lovely Liberty lawn prints, I always make sure I have strengthened the bag with a heavy duty interlining. If using cotton duck or similar, such as the Cath Kidston range, I generally just use an equal quality lining, but always double stitch the seams.


Another bag I like to make is the messenger-style, also from 100% cotton. Now that I am using a wheelchair, having an open topped bag is not really great as far as security is concerned. My bag has to go on the back of my chair, so I need to have a flap or fastening to make sure no-one can easily dip their hand in the bag. A wide velcro fastening is a good idea, as it is noisy to open and would get my attention. Perhaps I could just put some of my collection of jingle bells inside the flap, in the same way cat owners attach bells to the little kitties' collars to warn off neighbourhood birdies! An adjustable strap is useful so that it is long enough to go diagonally over my body, but can be shortened when hanging on the handles of the chair. I think I will make a co-ordinating set of one large bag for the back of my chair to hold todller and family essentials (juice, nappies, kitchen sink etc) and a smaller one to wear across my shoulder whilst sitting in the chair. This keeps my hands free to push the wheels, but still means that my phone, purse and medication are within easy reach and are kept safe. My wheelchair is black and grey, so I think muted tones will work best (if I have to use a wheelchair for now, I may atleast be co-ordinated!). I have some black denim and some black and white polka dots fabric. I think a couple of fabric roses made from grey zips and a little felt, a few buttons and some ribbon ties will finish the look. I have just bought myself a new black winter coat. I think I might have to make some matching zipper roses as a brooch for the coat too. A girl can never have too many accessories!

Fancy Folds


I love to make fancy shaped and folded cards but worry that if I send it to someone who is not a card-maker, that they won't understand the design or know how to display it. I have thought that if I batch made the cards, I could use a photo of the finished card to put on the cello packaging as an explanation, but I never really make more than one of the same design. Not even when I am making a hundred cards for our school PTA fundraisers. The joy of crafting for me is that each card is different. I hate repetitive crafting, unless it is for a special event such as a wedding invitation commission. When I do make fancy folded cards, I generally make them for people that we can give the card to in person. For example, my daughter went to her friend's birthday party recently and I made her a side stepper card with additional waterfall mechanism on the main panel. Because my daughter was giving her friend the card at the party, I made an acetate gift box adorned with ribbons to transport the card. Not exactly post-box friendly!


I have also made this rather unusual 4 panel stepper fancy folded card for my identical twin nieces' 2nd birthday. It uses Pollycraft Twiddly Wings images, which I cut and placed, after colouring with Promarkers and Sakura pens, onto a mixture of papers over my super-wide stepper base. I added acetate sheets above the steps for the fairy girls to sit on and to give the illusion of elements floating above the main card. Lots of doodling, gems and glitter were added to make the card appeal to twin toddlers. This definitely requires hand-delivery as it is 50cm wide and most certainly is not up to withstanding the postal system.


This week's Monday challenge at Incy Wincy Designs is for any project which includes folds. Believe me, there were a number of folds used to create this card. Not just for the steps, but on secret little opening panels behind some of the characters and also inside the structure. I hope the twins like it. If you haven't visited Incy Wincy Designs before, do pay them a visit for some great ideas. The challenge is sponsored by Karen's Doodles. This is the first time I have visited Karen's site and I love it! Really well-drawn whimsical digis at great download prices. Another site I am starting a wish list on...

Sunday 25 September 2011

A Cause for Celebration


As I have mentioned here previously, I have been working on an album for some friends who married last year. Unfortunately, I have only managed hasty snaps of the pages as they are too large to scan in and I have yet to ask my resident expert to photograph them for me.

This page is quite masculine deliberately because it features the groom's sons. I wanted to lighten it slightly with an injection of my theme colours, so I chose to add texture and colour at the same time with lots of different ribbons. I tied the colours in again with flocking on all of the stamped areas (stamps from Stampin' Up!). The scalloped edge paper is from Papermania. The celebrate wording is printed onto Safmat from Letraset and the paper behind the photograph is from Papermania's capsule collection. It isn't clear on my poor photo, but I have embossed around the image and around the medallion stamp which adds detail without clutter.

I would like to submit this layout as an entry into Crafty Ribbons' challenge this week. They have a great prize of an autumnal tones ribbon bundle, which I would love to win and use of my humble crafting projects.

So Many Cuppas


Although I enjoy a cup of tea and have been a stay-at-home mum for 7 years, I don't think I have ever crept above an average of 2 cups of tea or coffee a day, even though I am never more than a few steps from the teapot. Until now that is. Even through the sleep deprived early months with each of my babies, I didn't resort to much caffeine. Most probably because every time I boiled the kettle, I started doing something else and didn't get around to making the drink. If I did make it, I didn't get chance to drink it. Since my accident earlier this year, I have been spoilt by the carers who come in to look after me at home. I have a cup of tea made for me by each carer at each visit, as well as having a flask of coffee, so my average is most definitely above 2 now.

With so much tea, it seems only fitting that I show you my tea cosy. I love this project. I made it with left overs of some fuschia Rowan chunky yarn, which I used to make cardigans, hats and scarves for my daughter, twin nieces and their teddies. I also made fingerless gloves and a snood for myself, so have made thoroughly good use of the large batch that I bought in a John Lewis sale.

I would like to enter my project into the current Crafty Ribbons blog challenge, anything goes. I have been browsing their store, compiling a huge wish list as I am a real ribbon horder. Just like buttons, I am addicted to ribbons as they feature in so many crafts. You can never have too much!

I think one of the reasons I love ribbon and trimmings so much is that my Grandad was a manager at a company which manufactured trimmings, and long after he died, my Nana still had a large suitcase of ends-of-line and new product samples from his company. As she taught me to sew, I was sometimes allowed to use some of her trimmings supply and still now I think of those times when I am rummaging through my own collection, much of which is vintage in origin.

I bought quite a lot of the polka dot gross grain ribbon that I used in this project. I have it in lots of colours and widths and will be sad when it is all gone. I have used in lots of projects, from cards, scrap layouts and hair slides to embellishments on clothing, vintage-inspired aprons and steam punk style brooches. I also have it holding up a heart-shaped hanging that I made for my craft space and have garnished one of my scrap tote bags with it. Spots and ribbon, what's not to like?

Colourful Inspiration


Oh no. Another source of inspiration. My brain may just explode! I paid one of my regular visits to the Jellypark challenge blog yesterday and discovered a link to a really great website full of colour palettes for designers, crafters and anyone who loves colour. Design Seeds has page upon page of colour co-ordination ideas, just perfect for overcoming designer's block.

Claire at Jellypark has set this week's challenge based on Design Seeds' colour palettes. I have chosen an oldie-but-a-goodie called 'Color Picked' ~ those of us in the UK, please excuse the American spelling! I think I chose this set because it is based on colours that I like to wear and use in home decorating. I think that the start of autumn also influenced me in the selection of heather hues and sage green. Had the birds left any on my trees, these would be the colours of the plums being harvested this month, but I have watched them munching the fruit all summer long.


Anyway, getting back to the challenge... I have made a card using one of Claire Keay's gorgeous images of a little cutie being transported into the sky by her balloon. The colours were perfect for this challenge, although my experiment of using clear stickles over the top of the decoupaged balloon didn't come out as I had expected. I thought the plum colour of the balloon would show through the clear glue base of the stickles, but the colour has split and become bronzy, but still very pretty. That's inkjet ink for you!

I tore the image edges freehand and layered it up at an angle. The backing paper was originally a burgundy colour with white dots, but I coloured over the top with a shale Promarker to give a two-tone look. I then laboriously pushed out a whole 8x8 sheet of die cut flowers (from a Cosmo Cricket kit) to give an interesting layer in sage green with pinks and plums. It took me almost a whole episode of Casualty to push out those flowers with my trusty pokey tool, but then I do have trouble with my hands and wrists!

I coloured some of the tiny paper flowers with promarkers and kept some plain. I layered them up with bronze brads to add more dimension. The muted sage cotton lace is from American Crafts, finished with two overlaying flower shaped brads in complimetary tones (not sure where they were from - they've been in my stash for about 7 years or so!). The sentiment is actually a white icing rub-on from Quickutz, applied to a small piece of patterned cardstock overlaid on another piece of cardstock printed with script over-coloured with Promarkers - phew! I also added more of the flowers and brads to the side of the sentiment for balance. The sentiment just edges over the side of the rectangular card so that it makes it need an 8x8 envelope.

The tomato pip just above the ribbon is the work of my two year old son Joel who helped my husband with the photography. He was at the side of the card when it was being snapped and he thought that the photos were of him. Aah, bless him! I have removed the pip now, but was mid-way through editing the picture before I spotted it, so it is staying. It also made me laugh, not a frequent occurence when one of my projects gets damaged, but Joel is so cheeky, he gets away with it. He is rarely to be found with clean face or hands, so the card got off lightly with just a tomato pip.

Swirls and Pearls

Swirls and Pearls is the theme of the challenge set by Anita on the Pollycraft challenge blog this week. I have chosen to join in using this great Luna Bitterfrost digi stamp designed by Pollycraft's very talented Paula Lee. I coloured it with Promarkers and Flex Markers, grounding the image with the palest of pinks.

For my swirls, I have chosen paisley with funky skull and crossbones in the middles to represent the posion symbol of whatever Luna is working on. The paisley shapes were cut by hand from a matt-stack (Rock Star by DCWV). I love this image of the scientist as I studied Chemistry and worked as a research chemist before my children were born. Perhaps Luna is a prettier version of me in my lab-coat wearing days, even down to the plaits! Not sure my glasses were quite so funky though, just standard eye-protection! I have given her my colouring too, but her lab coat is most definitely cleaner than mine ever was.

For the pearls element of the challenge, I have used a little artistic licence and used Liquid Pearls instead of actual pearl embellishments. Cheeky, I know, but I think that chemist Luna would approve of the use of a synthetic liquid compound instead of solid pearl embellies, don't you?

The very tactile pin dot paper in muted teal and black is from Papermania's Chatsworth Signature A5 range. This paper has a suede-like feel to it and is really nice to handle. I have used other papers from K & Co's designer 6x6 series to add layers and to make the paper-ribbon stripe behind Luna. The overall card was covered in paisley paper from Papermania. The ribbon tied across the card is from Maya Road. It is so thick, it is actually a little like shoe-lace.

My finishing flourish is the 'fumes' from the top of the test tube. I made this using a piece of pink net fabric which I gathered and threaded onto a safety pin before fastening it to the page. I can't say that I ever worked on anything which gave off nice pink coloured fumes, but it adds to the image!

Sunday 18 September 2011

Not Big On Pink


I love pink. I use a lot of pink in my crafting. I also like to wear pink, but it is nice to take a break sometimes. That's what attracted me to the challenge at Our Creative Corner - a challenge to use blue with a little accent in pink. I have made a card formy husband to thank him for decorating my craft room, oops, I mean our dining room! I guess he is glad I didn't ask for that to be pink!


The card is based on blues with some neutral brown, and just a touch of pink in the stickles glitter glue used to highlight some of the detail on the love birds image. The tiny brads in the flowers are my metal element, with ribbon added for good measure and extra texture.


I really enjoyed playing around with textures making this card, carrying the detail on from the stamped image to the background with the simple use of liquid pearls. It represents the colours in the room, with a similar amount of blue, brown and pink.


I have only recently discovered the work of the ladies over at OCC and I know I will be a regular as their designs are really inspiring.

Saturday 17 September 2011

Embellish Me More


This week's challenge at Crafty Emma's is titled 'Embellish Me More' - a challenge to use at least 4 types of embellishments in a papercraft project. My submission is a 12 x 12 scrapbook page, part of an album I have been making for some friends to celebrate their wedding.

The whole album is based on a theme of black, white and claret. The embellishments I have used have mostly been made by me throughout all the pages. I started by using Photoshop to convert the colour photo to black and white then hand colouring the bouquet using Twinkling H2Os. I overlaid vellum which I patterned with superfine holes around the outline of the bouquet. I attached it using small brads. I cut a scalloped border from white paper and embellished it with tiny claret gems. A vellum sentiment accent was added to the side of the photo and a little bird (Stampin' Up!) on a branch punched from black card to highlight the top right over a scalloped mini page. I made a simple white parchment craft border for the left hand side and a mini version of a wedding dress, also from parchment which I hung on a little hanger that I twisted from purple wire. The page was finished off with a white rub-on title 'beautiful'.


Although the overall effect is quite simple, the parchment work took a long time, so the whole page actually took 12 hours! I am pleased with it though, so it was worth the effort.

Wednesday 14 September 2011

Love Banner


As much as I love making cards, I know that the person receiving one is most likely to display it for a week then throw it into the recycling. Sometimes it is nice to make something instead of a card. Something the the recipient might keep. Paper bunting banners are great for this. I have made quite a few for friends and family and most of them are still hanging where they were originally placed, which I take as a real compliment and proof that they like their gift.

The banner in the picture above is for our neighbours and good friends to celebrate their anniversary. I will also cheekily be entering it into this week's Jellypark challenge, Pass it On as I will be 'passing it on' to L & J.

There are so many papers, stamps, embellishments and techniques used in this piece. Stampin' Up!, My Mind's Eye, DCWV, Lawrence Llewellyn-Bowen, I-Clings, embellishments from Cardinal Colours and Crafts Superstore among others. Most of the inks are Tsukineko Dew Drop Brilliance as I love the subtle shimmer they give. I also used plenty of clear and pearl UTEE, ribbons and buttons from my stash. The jingle bells are from East of India and the diamante ribbon slider is from American Crafts. The base triangles are cut from mountboard and the holes punch (like a hot knife through butter) with my Cropadile.


I have attached old fashioned picture hooks to the ends of the ribbon as our houses are a pair of Edwardian villas, fully equipped with handily placed picture rails for just such hangings!

Pass It On


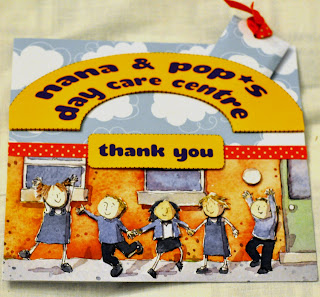
This week's challenge at Jellypark is titled 'Pass It On'. Perfect! Any papercraft project made to pass on to someone else, a card, a gift, a 'thank you'. For almost 3 months now, my parents have been looking after our youngest child. Joel is a lively (erm, naughty!) 2 year old who loves to climb, explore and raid my Mum's fridge. Every weekday morning, he is whisked off to my parent's house when my husband leaves for work - I have a disability which is currently making it difficult for me to look after Joel when I am on my own. Joel spends the day at 'Nana and Pop's Daycare' and is picked up after his dinner when my husband trudges his weary way home from work (only to have to come in to look after me, our other two children, the house and, of course, Joel).


My Mum and Dad (Nana and Pops) are going on holiday at the end of this week. Off to the beautifully sunny island of Malta for 2 well deserved weeks of swimming, sight-seeing, good food and relaxation. Every year, they return to the same holiday spot. I love it there too and eagerly await their return with video footage of their hols. This year, they have bought a new handycam in preparation for their trip. I decided to buy them a memory card for the camera as a little 'thank you' from me for everything they have been doing to help us since my accident in June.


When we first took my parents with us to Malta back in 2001, my Dad and I became hooked on snorkelling. The sea is so clear and visibilty is perfect for spotting a whole host of sealife. We have taken plenty of underwater photos between us, but my Dad is keen to film underwater too. Move over Jacques Cousteau! Dad has been searching for a reasonably priced underwater camcorder for some time. The one they picked is great for snorkellers. It can be used underwater, is lightweight and operated with one hand. I hope he returns with lots of footage for me to edit anto DVD. Perhaps I can watch the video whilst listening to seaside sound effects and pretend I am there too, or maybe I should lay in the bath to wtach it, just for the watery effect!


The thank you card was made using one of Claire Keay's beautiful images which I downloaded at Crafts U Print and printed onto matte photo paper. The cloud paper is from Pink Petticoat and the ribbon is from Anita's. I made the simple arch shaped banner and the thank you sentiment in Photoshop, layered up with foam dots. The decoupaged elements of the playground scene are layered with Collall dimensional photo glue. I used more of the cloud paper to make a little tag shaped wallet envelope (easy to whip up with my Martha Stewart Score Board) and attached ribbon to the top. I used the wallet to hold the camcorder memory card, so the card acts as gift wrap too. I slotted the little package behind the top layer of the 'Nana and Pop's' banner and held it temporarily in place with a repositionable glue dot so that it didn't fall out, but also so that when it is removed, it doesn't damage the surface of the card.


My husband delivered the card this morning and my Mum tells me that Dad is already using it to film Joel's naughty antics in their flower and veggie filled garden. Now, if only he would stop sneakily picking their home-grown tomatoes and raiding the fridge... Go on Joel, Pass It On.

Tuesday 13 September 2011

How Do You Use Yours?


I have always loved ribbon. I mean, reeeeaally loved ribbon! I use it in crafts of all kinds. I sew with it, make jewellery with it, knit with it and, of course, papercraft with it. Over at Netty's Cards, there is some gorgeous ribbon blog candy up for grabs from Fantastic Ribbons. Annette would just like to know our favourite ways to use ribbons. Do I really have to pick just one?

At the moment, I love randomly pleating them and stapling them to give a 'grunge' effect. I also like inking them up to change the look (Promarkers are great for this). I like to weave them, stamp on them, make flowers with them, knot them, tie them in bows and use them to attach embellishments. I use them to hide seams and glued areas, to add texture and movement and to draw the eye to one particular area.

Is there anything we don't use ribbons for? I look forward to reading what other followers of Annette's blog do with theirs.

What's New Pussycat?


Until I started taking part in papercraft challenges (just 3 weeks ago), I had never made a card using a sketch as the outline idea. I been making cards for 13 years, but have always used my own ideas or used other cards for inspiration, but more in the sense of the overall feel rather than the positioning of the design elements. This is only the third card I have made based on a sketch, but I think I may be hooked!

I am still just finding my feet in entering challenges, so I have only really entered one card in each challenge and used each card for just one challenge so far. With this card, I am going for it - two challenges with one card! I would like to enter this card in Fetch-a-Sketch challenge 6 as well as the Charisma Cardz challenge on the theme of 'inspired by a song'.

The digi stamp of Lil Kitty made me think of the Tom Jones song as soon as I saw it on the Pollycraft site, so when I saw the Charisma Cardz challenge, I knew I had to use it. My daughter loves this image and had to have her own copy to colour too. The stamp is coloured using Promarkers and is mounted on an iridescent scalloped circle, layered onto a ditsy print paper. As with my Alien Adventure card, I have double embossed around the central panel on the white 8x8 card base and infilled with Flexmarker colouring to make the image 'pop'. The scalloped dotty strip is from Polkadoodles 'Double Sprinkle of Kraft' CD. The two scrunched paper flowers are made from scalloped circles cut from the Financial Times, coloured with Promarkers and glazed with silicone glue, which also stiffens them and holds them in shape. The sentiment is stamped onto a chipboard circle and the card is finished off with a circular tab at the top left. Phew! Lots of the detail of this card, such as the double embossing, don't show on the photo, but they make it look 'high quality' close up and hopefully let the recipient know that we care for her very much.

I would like to thank the designers who have set these challenges and, of course, the prize sponsors. You are helping to keep my hands and brain occupied at a very stressful time in my life!

Monday 12 September 2011

Alien Adventure


Having been working on cards for men this weekend, I thought I would make a card for a younger member of the male gender. This card is for a friend of my son who will soon be 7. It is made with the Stamp Fairy challenge in mind, which, this fortnight, is based on one of their sketches.

The card base is 8x8, so it is actually made from two card sheets joined together with the seam inside disguised by the insert. The central base panel is iridescent paper from Kanban. It is hard to photograph, so the colours don't look as though they go together - but trust me, they do! It is green with a sheen of purple in the right light. I embossed around the outside of this layer and infilled the area with purple Promarker and Sakura gelly roll pens. It doesn't look like it in the photo, but it makes the central panel really stand out against the white border. The scalloped circle was hand-cut with a pair of fancy scissors borrowed from my 5 year old daughter's craft cupboard! Most of the papers are Cosmo Cricket, with a little Papermania thrown in for good measure! The cute alien stamp is, of course, from Stamp Fairy, coloured with Promarkers and Flex Markers with a little doodling using a Letraset 0.5mm drawing pen. The sentiment was stamped onto white card which I inked up to tone in with the alien background layer. The three circles at the top left were cut from a 6x6 paper sheet, accented with Sakura gelly roll and glaze pens then layered up with foam dots. I love the circular foam dots (from The Range) as they are easy to peel and the 'left over' sticky foam is great for giving dimension to larger areas. They are great value too at just 99p per pack. I added lots of doodle detail all over the card and also used very thin strips of paper along my main stripes just for extra dimension and detail without cluttering the overall look of the project.

Creative with Chipboard


Over at Kaboodle Doodles Challenge Blog, challenge 84 this week is to make a papercraft project using chipboard.

My project to enter into the challenge is a cute little autograph book for my niece. The covers are made from chipboard and the front is embellished with a chipboard flower and button, which I painted with paint daubers. The covers are decorated with ice-cream themed paper and the inside pages are decorated with chipboard shapes with a foodie theme (mostly freebies from magazine cover gifts). It is held together using the Bind it All and the wires are decorated with ribbon snips. The embossed metal frame on the front is from Making Memories.

My niece is in her final year at primary school, so I thought it would be nice to give her this so that she can record memories of her school and for her friends to write little messages and draw doodles in. I hope she likes it!

Anything But A Card


This week's challenge from Quirky Crafts is set by Caro and she has chosen Anything But a Card (ABC) as the ABC made her think of her son starting school for the first time. The start of the school year makes me think that I need to start on making Christmas gifts. Handmade gifts deserve handmade packaging, so here is the first of many!


This gift box is made using a recycled plastic cake box from a supermarket. It is so straight forward that it is easy to batch make if you need lots. Unfortunately, it would mean eating lots of cakes to get enough boxes though...


I used a scalloped edge punch to make 2 rows of trim from Bazzill basics for the sides. I cut strips of striped paper to make a decoration and to hide the seams, then topped it with red and white grossgrain ribbon. I made a ribbon flower and a paper flower for the top. Using small paper off cuts and a sentiment stamp, I made a gift tag and washing instructions label (for the hand knitted gloves inside). It was finished off with a simple ribbon bow. The box is made so that it can be opened without damaging it. That way, it can be used again by the recipient. More recycling!


My top tip is to use a really good adhesive as it can be tricky to get the paper to stick to the plastic.


Sunday 11 September 2011

A Card for a Friend


Making cards for men can be tricky. If they have an obvious hobby or interest, that can give you a head start, but there are only so many cards you can make for the same person on the same subject! This card is for a friend's husband. I like the fact that it is quite masculine, but is softened by the ribbons which tie it closed, rather than just being decorative.


The papers are all from my long-held stash. The embossing plate is QuicKutz and the scalloped punch is Woodware. The word 'Friend' is stamped using Versa Fine onto vellum and attached over the ribbon to finish the card.


I would like to enter this into the Stamps R Us challenge, this week entitled 'Friendship'.


Thursday 1 September 2011

Polkadoodles Challenge Week 34

Firstly can I say, I somehow managed to make the colours seem quite garish in this image. The original card and photo are far more tastefully coloured! It seems to be something to do with compressing the image size. Not sure why though.


This week's blog challenge over at the Polkadoodles blog is to use some of Nikky Hall's fab spotty, dotty papers from her great collection of CD's. The choice of papers can be combined with any stamped image and can be for any occasion.


I have made so many cards over thelast year using Nikky's papers and I especially love polka dots. For this challenge, I decided to base my card around the scarecrow digi stamp from Sundae of Seasons as it is one I haven't yet used and I was looking for an autumnal feel The lady scarecrow is teamed with the funky giant spots kraft paper from Double Sprinkles of Kraft CD. As I couldn't resist using some small polka dots in there somewhere, I also used a dotty border from the same CD. I added a little colouring on the scalloped border using Flexmarkers, so that it would tone in with the kraft background.


I wanted the card to be a little different from the others I have made before with the spotty papers, so I decided on an acetate rounded front. I made a simple mechanism so that the card folds out flat into an 8x8 envelope for posting, then the recipient just slots a tab of the acetate into the back of the card to turn it into a dimensional bow front. I used two of Nikky's stamps, the fence and the barrel of apples (also from Sundae of Seasons), coloured them with Promarkers and Flexmarkers before mounting them with foam dots on the outside of the acetate. They are highlighted slightly with some Sakura glaze and stardust pens. The scarecrow herself is mostly coloured using Flexmarkers and is mounted using two layers of sticky pads to make her pop out from the background. The card is finished with one of the Polkadoodles versatile sentiments with a little Sakura glaze over the top.


I think I will recreate this idea with lots of other images as it was actually quite simple once I figured out what I wanted to achieve and how to make it suitable for posting.